
Modules ( some times called libraries ) are packages of program code that expand the capabilities of what can be done in Python. Some allow us to send emails, draw on the screen, work with databases, do complex math, and many other things. Many come prepackaged with Python, and many more can be downloaded and installed from the web. But how difficult is to to create one of your own?
Suppose that you have several bits of python code that you use over and over again. You find yourself entering that same code in project after project. Would it be nice to just keep these code bits in one resource file, and never have to type them in again? Will, you can.
Consider the turtle.
One of the Standard Modules ( modules that come prepackaged with python ) is called turtle. It creates a graphics window on the screen, and allows us to draw in it. We can bring it into our project with the “import” command.
import turtle

Bob = turtle.Turtle()

Bob.forward(10)
Bob.right(90)
Bob.forward(10)
Bob.backward(20)
Bob.write("Hello World")
Bob.hideturtle()
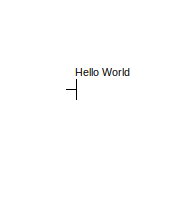
OK, Now try this:
Using idle ( Python’s Integrated Development and Learning Environment ) that comes prepackaged with Python,
click on the File menu in the upper left corner of the window,
click on Open Module
type in the world turtle
and press the [enter] key.
The first few lines of turtle.py:
#
# turtle.py: a Tkinter based turtle graphics module for Python
# Version 1.1b - 4. 5. 2009
#
# Copyright (C) 2006 - 2010  Gregor Lingl
# email: glingl@aon.at
#
# This software is provided 'as-is', without any express or implied
# warranty.  In no event will the authors be held liable for any damages
# arising from the use of this software.
#
# Permission is granted to anyone to use this software for any purpose,
# including commercial applications, and to alter it and redistribute it
# freely, subject to the following restrictions:
#
# 1. The origin of this software must not be misrepresented; you must not
#    claim that you wrote the original software. If you use this software
#    in a product, an acknowledgment in the product documentation would be
#    appreciated but is not required.
# 2. Altered source versions must be plainly marked as such, and must not be
#    misrepresented as being the original software.
# 3. This notice may not be removed or altered from any source distribution.


"""
Turtle graphics is a popular way for introducing programming to
kids. It was part of the original Logo programming language developed
by Wally Feurzig and Seymour Papert in 1966.

Imagine a robotic turtle starting at (0, 0) in the x-y plane. After an ``import turtle``, give it
the command turtle.forward(15), and it moves (on-screen!) 15 pixels in
the direction it is facing, drawing a line as it moves. Give it the
command turtle.right(25), and it rotates in-place 25 degrees clockwise.
Yes, the Python module “turtle” is written in Python. We can open it with idle, and view the code.
The person who created it used the exact same tools you now have on your computer.
There is no reason why YOU can’t do the same.
YOU can create your own Python module, which can be “import”ed into any Python project.
Creating a basic, first module.
OK, now lets say that we open a new file, cut/past the following text into it, and save it as mymod1.py.
"""
mymod1.py
Written by   yourname.
Last updated: YYYY-MM-DD

This is an example of a simple module.

"""

version = 1.0

def function1(text):
    """Prints a line of text on the screen."""
    print("Function1: ", text )

def function2(text):
    """Returns the length of text, as a string."""
    return( str( len( text ) ) )

if __name__ == "__main__":
    print( __doc__ )

# End of mymod1.py
Next, open another new file, cut/past this text into it, and save it as testing1.py.
"""
testing1.py
Written by    yourname

This is to test the mymod1 module.

"""

import mymod1

mymod1.function1("Hello World.")
print( mymod1.function2("Hello World.") )
print( mymod1.version )
print("-------------------------------------")
print( dir(mymod1) )
print("-------------------------------------")
print( mymod1.__doc__ )
The output is:
12
1.0
-------------------------------------
['__builtins__', '__cached__', '__doc__', '__file__', '__loader__', '__name__',
'__package__', '__spec__', 'function1', 'function2', 'version']
-------------------------------------
mymod1.py
Written by yourname.
Last updated: YYYY-MM-DD
This is an example of a simple module.
Congratulations, you have just created and tested a module.
All we had to do was create a normal python script (mymod1.py), with a bunch of functions, and save it as we would any other.
Then, using the import keyword, we can bring mymod1.py into any python script, and use the funcitons defined in it.
There are no special codes, magic trick, or secret sauce.
It really IS just that simple.
Working with auto-complete and docstring.
Now, lets go back to testing1.py.
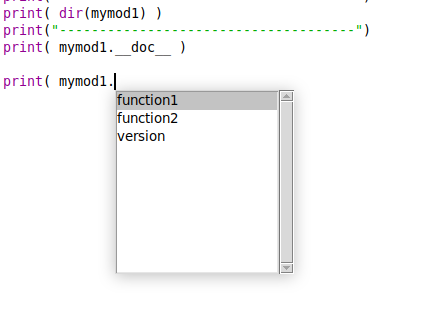
On a new line, enter print( mymod1. and just stop typing after the period.
After about 10 seconds, a pop-up menu will appear showing what your options are.
Note that this is a list of functions and variables that you have defined in mymod1.py.
Now select one of the functions on the menu, and see what happens next.
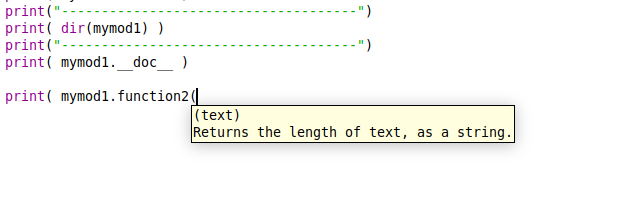
The line of text "Returns the length of text, as a string." is called the function’s docstring.
It is intended to remind you, or anyone using your module, what the function does.
Can you see where this is coming from inside mymod1.py?
Can you see why creating meaningful docstrings is important?
The purpose of __name__, __main__, and __doc__.
Note that in mymod1.py, there are these lines
if __name__ == “__main__”:
print( __doc__ )
What does this do??
Will, if mymod1.py is run as a stand along scirpt ( being run directly ), this code block will execute, and the doc-string for mymod1.py will be shown in the screen.
But, if mymod1.py is imported into the workspace using the import keyword, then this code block will not execute.
The key to understanding how this works, is the built-in variable __name__. The value of this variable will be ”__main__” if the code being executed was NOT brought into the workspace with the import keyword.
If the code IS being brought into the workspace with the import keyword, the value of __name__ will have the name of the module ( "mymod1.py" ). And since "mymod1.py" is not equal to "__main__", then the code block is NOT executed.
The built-in variable __doc__ contains the doc-string of the module, which is the comment area at the top of the script.
So, if mymod1.py is being run as a stand-alone script, the documentation (doc-string) will be shown. If it's being run from behind an import, the documentation (doc-string) will not be shown.
IMPORTANT: __name__, “__main__”, and __doc__, all begin and end with 2 underscore characters, not just 1. This can be hard to see when printed in some books, or on screen in some typefaces. So be careful when working with these built-in variables.
Moving on to something useful.
Lets create a new module called mystuff.py
"""
mystuff.py
Written by    yourname
Last updated: YYYY-MM-DD

This is a general purpose module,
to hold many useful functions.

"""

import os
import fnmatch

version = 1.0

def ScanForFiles(root=".", pattern="*.*"):
    """Returns a list of file names that match the pattern."""
    reply = []
    for r, dirs, files in os.walk(".", followlinks=False ):
      for filename in files:
        if fnmatch.fnmatch(filename, pattern):
          reply.append( os.path.join(r, filename ) )
    return reply


# Additional functions and classes can go here


if __name__ == "__main__":
   print( __doc__ )

# end of mystuff.py
Don't forget to save it as mystuff.py, or you will get a 'file not found' error when you try to test it.
And to test this module:
"""
testing2.py
Written by  yourname

This is a test of mystuff.py

"""

from mystuff import *

# This next line may take a few minutes to execute.
print( ScanForFiles( ".", "*.png" ) )
After runing for a few minutes, this will print a Python list object of all the files that match the pattern "*.png".
You could now uses mystuff.py as a starting point to create your own general purpose modules.
You can save your new module, giving it any name you wish, just so long as it ends with “.py”.
IMPORTANT: When every you make any changes to your modules, always make a backup copy to another computer, USB memory stick, and/or to cloud storage. You never know when something might go wrong. It's far better to make a copy and not need it, than to need it and not have it.
Functions, inside classes, inside modules.
Like Russian nesting dolls, you can place functions, inside of classes, inside of modules.
This is actually a very common way of structuring a module. The reason why will become clear a bit latter.
Consider as an example, a module that I have written called database.py. I created this module to help in writting Python scripts that use SQLite.
"""
database.py
Written by Joe Roten
"""

import sqlite3
from sqlite3 import Error

class Database:
  """
  Database class.
  Written by Joseph Roten, 2020/04/15
  Last updated: 2020/10/03
  This class is a wrapper for the sqlite3 module.
  """
  conn = None
  version = "4.5"
  file = ""

  def __init__(self, database=r"pythonsqlite.db"):
    self.file = database
    try: self.conn = sqlite3.connect(self.file)
    except Error as e: print( e )

  def exec(self, sql):
    """Execute a SQL command and return the results."""
    reply = ""
    try:
      c = self.conn.cursor()
      c.execute( sql )
      reply = c.lastrowid
      if sql.lower().strip().startswith("select"): reply = c.fetchall()
      if sql.lower().strip().startswith(".schema"): reply = c.fetchall()
    except Error as e: print( "Warning: " + str(e) + "\n" + str(sql) )
    return reply

  def createTable(self, strTable, strFields=""):
    """Create a new table if it does not exists."""
    cmd = "CREATE TABLE IF NOT EXISTS {} ( id integer PRIMARY KEY, dtCreated datetime default current_timestamp{});"
    if strFields.strip() != "": strFields = ", " + strFields.strip()
    return self.exec( cmd.format( strTable, strFields ))

  def insert(self, strTable, dictValues):
    """Insert a record into a table."""
    (v1,v2,v3) = ("","","")
    for key,value in dictValues.items():
      if v1 != "": (v1,v2) = (v1 + ",", v2 + ",")
      v3 = value
      if isinstance(v3, str): v3 = '"' + self.encode(v3) + '"'
      (v1,v2) = (v1 + key, v2 + str(v3) )
    return self.exec( "INSERT INTO {} ({}) VALUES ({});".format(strTable, v1, v2) )

  def encode(self, text):
    """Encode a string of text so it can be saved to the database."""
    reply = text
    reply = reply.replace("'", "&#"+str(ord("'"))+";")
    reply = reply.replace('"', "&#"+str(ord('"'))+";")
    for x in range(0,32): reply = reply.replace(chr(x), "&#"+str(x)+";")
    return reply

  def decode(self, text):
    """Decode a string of text that was encoded with self.encode()."""
    reply = text
    reply = reply.replace("&#"+str(ord("'"))+";", "'")
    reply = reply.replace("&#"+str(ord('"'))+";", '"')
    for x in range(0,32): reply = reply.replace("&#"+str(x)+";", chr(x))
    return reply

  def close(self):
    """Close the database connection."""
    if self.conn != None:
      self.conn.commit()
      self.conn.close()

  def commit(self):
    """Commit any changes made to the database."""
    if self.conn != None: self.conn.commit()

  def addColumn( self, strTable, strName, strType):
    """Add a new column to an existing table."""
    return self.exec( "ALTER TABLE {} ADD {} {};".format(strTable, strName, strType) )

  def dropColumn( self, strTable, strName):
    """Remove a new column from an existing table."""
    return self.exec( "ALTER TABLE {} DROP {};".format(strTable, strName) )

  def schema( self ):
    """Return the database schema as a set of records."""
    cmd = """SELECT m.name, p.cid, p.name, p.type, p.pk, p.dflt_value, p.[notnull]
      FROM sqlite_master m LEFT OUTER JOIN pragma_table_info((m.name)) p
      ON m.name <> p.name WHERE m.type = 'table' ORDER BY m.name, p.cid"""
    return self.exec( cmd )

  # End of database class
And now, an example of using database.py
import database

# Open the database file.
db = database.Database("testdata.db")

# Create the table "Addresses" if it does not exists.
db.createTable("Addresses", "Name TEXT, Address TEXT")

# Insert some data into the table.
db.insert("Addresses", {"Name":"John Jones", "Address":"67 Maple Street"} )
db.insert("Addresses", {"Name":"Tina Tay", "Address":"32 Main Street"} )
db.insert("Addresses", {"Name":"Sue Smith", "Address":"123 Oak Way"} )
db.insert("Addresses", {"Name":"Vena Vixan", "Address":"23 Elm Way"} )
db.insert("Addresses", {"Name":"Bill Bones", "Address":"12 34th Ave SW"} )
db.insert("Addresses", {"Name":"Charles Chang", "Address":"17 38th Ave SW"} )

# Show what is in the table.
records = db.exec("SELECT Name, Address FROM Addresses ORDER BY Name;")
print("Number of Records: ", len(records))
print("")
for record in records:
    print( record )

# Delete all the records.
db.exec("DELETE FROM Addresses;")

# Commit any changes and close the connection.
db.close()
The output is:
('Bill Bones', '12 34th Ave SW')
('Charles Chang', '17 38th Ave SW')
('John Jones', '67 Maple Street')
('Sue Smith', '123 Oak Way')
('Tina Tay', '32 Main Street')
('Vena Vixan', '23 Elm Way')
Does this style of code look strangely familary to you?
It should.
Consider again the example of working with turtle.py from above, and compare it with the sample code for using database.py.
import turtle

Bob = turtle.Turtle()

Bob.forward(10)
Bob.right(90)
Bob.forward(10)
Bob.backward(20)
Bob.write("Hellow World")
Bob.hideturtle()
Yes, the turtle.py module is another example of functions, in a class, in a module.
Intro to Object Orientated Programming
Now take a few minutes to look at the code bellow.
import turtle

Bob = turtle.Turtle()
Sam = turtle.Turtle()
Sue = turtle.Turtle()

Bob.pencolor("Red")
Bob.right(10)
Bob.forward(30)

Sam.pencolor("Blue")
Sam.left(150)
Sam.forward(50)

Sue.pencolor("Green")
Sue.left(120)
Sue.forward(80)
Sue.write("Hello, I am Green Turtle Sue.")
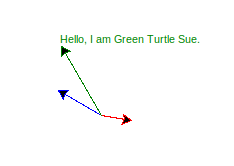
So now we have not just one, but three turtles running around the screen.
We have used the Turtle class, which was defined in the turtle.py module, to create 3 turtles ( Bob, Sam, and Sue ). Each of these turtles is an object of the Turtle class. Each of the objects has inherited the attributes ( a copy of the functions, variables, sub-classes ) of the class used to create it.
But each of the objects (turtles) is also independent of the others; you can change the color of one without affecting any of the others.
They have each received a copy of the attributes, they don’t share the same attributes. Or to put it another way, their variables are all local to the object, not global.
I recommend that you now take a few minutes, go over what I just said, and consider it carefully. It’s kind of important to understanding this very importing programming style.
This style of programming is called Object Orientated Programming.
One Class can be used to create many Objects of that Class.
You could, in theory, have a thousand turtles running around your screen, each one an object of the Turtle class. Why anyone would want to do this, I don’t know. But it could be done.
Another example: I could have 3 database files open at the same time, using the one Database class in the database.py module. I could then preform different operations on each object.
db1 = database.Database( “file1.db” )
db2 = database.Database( “file2.db” )
db2 = database.Database( “file3.db” )
This is just a brief introduction to the topic of Object Orientated Programming. I will be doing an article devoted to this topic in the near future.
Getting back on track.
So, now that we have had a little side trip into the topic of Object Orientated Programming, what does that have to do with creating our own modules?
Will, let us say that we need to define a bunch of points in 3D space ( objects ), and the direction that they are traveling. We could create a class in mystuff.py called Point, which would have 6 variables (X,Y,Z and deltaX, deltaY, deltaZ ). It would also have a function called speed().
Add this into mystuff.py
import math

class Point():
  name=""
  X=0
  Y=0
  Z=0
  deltaX=0
  deltaY=0
  deltaZ=0

  def speed(self):
      """Returns how fast the point is moving relative to (0,0,0)."""
      v1 = math.sqrt( (self.deltaX * self.deltaX) + (self.deltaY * self.deltaX) )
      v2 = math.sqrt( (v1*v1) + (self.deltaZ * self.deltaZ) )
      return v2

# End of class Point.
And this is how it might be used.
import mystuff

# create an array of 5 points.
points = []
for x in range(0,5): points.append ( mystuff.Point() )

# How to use point 0 of the array.
( point[0].X, point[0].Y, point[0].Z ) = ( 43, 87, 145 )
( point[0].deltaX, point[0].deltaY, point[0].deltaZ )  = ( 5, 16, 3 )
points[0].name = "Point00."
print( points[0].speed() )
# The answer is 10.677078252031311.
You could add functions to calculate the distances between two points, or the comparative speed between two points.
OK, I admit that this is prob not the best example, but it’s the best that I could think of on short notice.
What I’m trying to show here, is that you can create a new class in your module mystuff.py, and then uses it to create multiple objects of that class, for any of your projects.
Where to go from here.
What I have shown in this article is just the tip of the iceberg. But it should be enough to get you started in creating your own modules.
If you are interested in learning more about modules, class, and function, I recommend that you refer to the official Python documentation on the topic:
https://docs.python.org/3/tutorial/modules.html
https://docs.python.org/3/tutorial/classes.html
In concussion.
And that concludes what I have to say about building your own Python module. I hope that someone out there find’s this useful.
Everyone have a good day, and be kind to each other.
Joe Roten. www.gsw7.net/joe
Last updated: 2020-10-11

As always
The information on my website is FREE.But donations to help pay for Coffee and Beer are always welcomed.
Thanks.